Getting Started
This guide works as a starting point for QWR app development in Unity, helping you configure your development environment with all necessary hardware and software requirements.
Make sure you have a compatible QWR device available for testing your applications during development.
Configure Development Environment
This section describes how to configure the development environment to build QWR apps in Unity and contains information about hardware and software requirements.
Install Unity Editor
The minimum supported Unity version for QWR app development is Unity 2021 LTS. It is highly recommended to use the minimum supported version or higher.
For detailed information about the Unity installation process, please refer to Installing Unity in Unity Documentation.
Configure Android Environment
To build and run Android apps with Unity, the following components must be installed:
Android Build Supportmodule of UnityAndroid Software Development Kit (SDK)Native Development Kit (NDK)JDK
Install Android Build Support Module
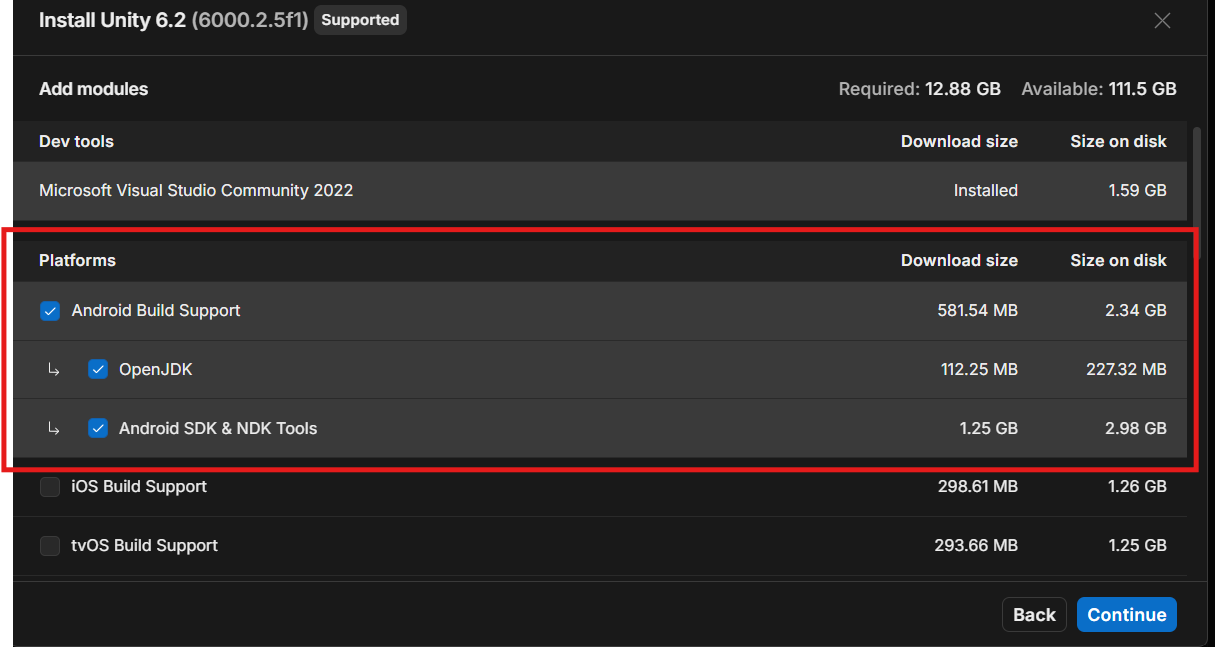
When installing the Unity Editor, ensure that the Android Build Support is selected:
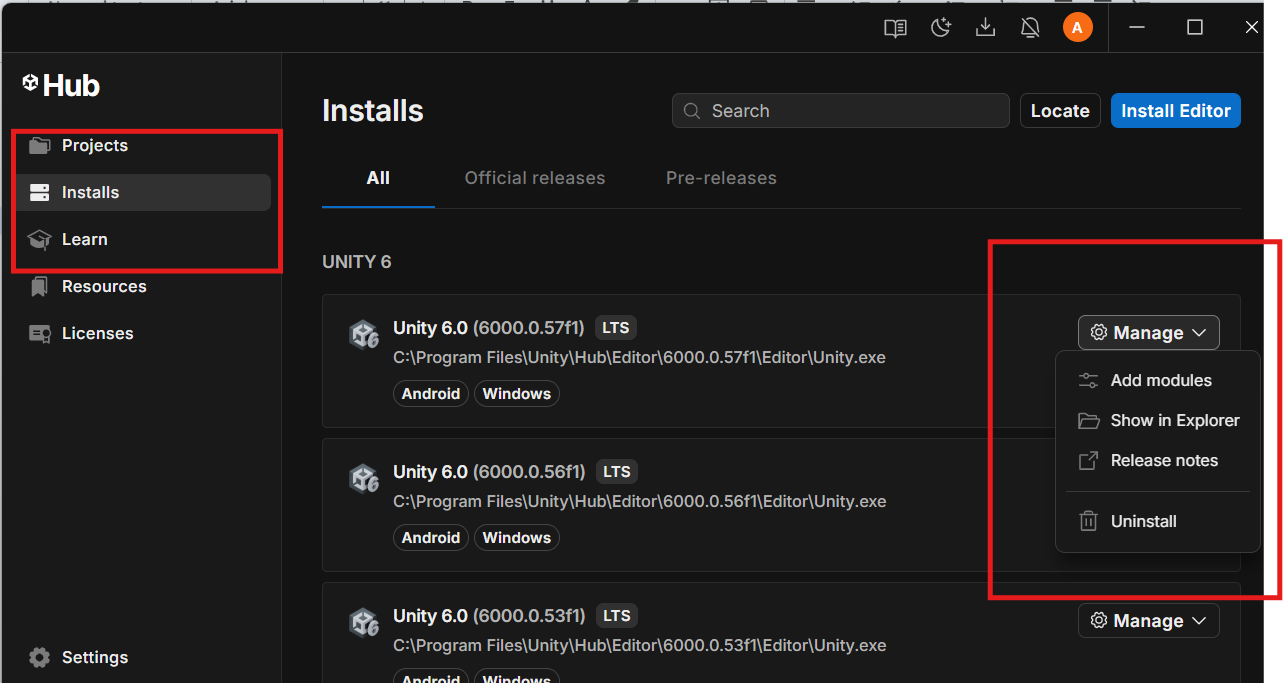
For already installed Unity Editor, modules can be installed anytime via the Unity Hub:
Install Android Tools Automatically
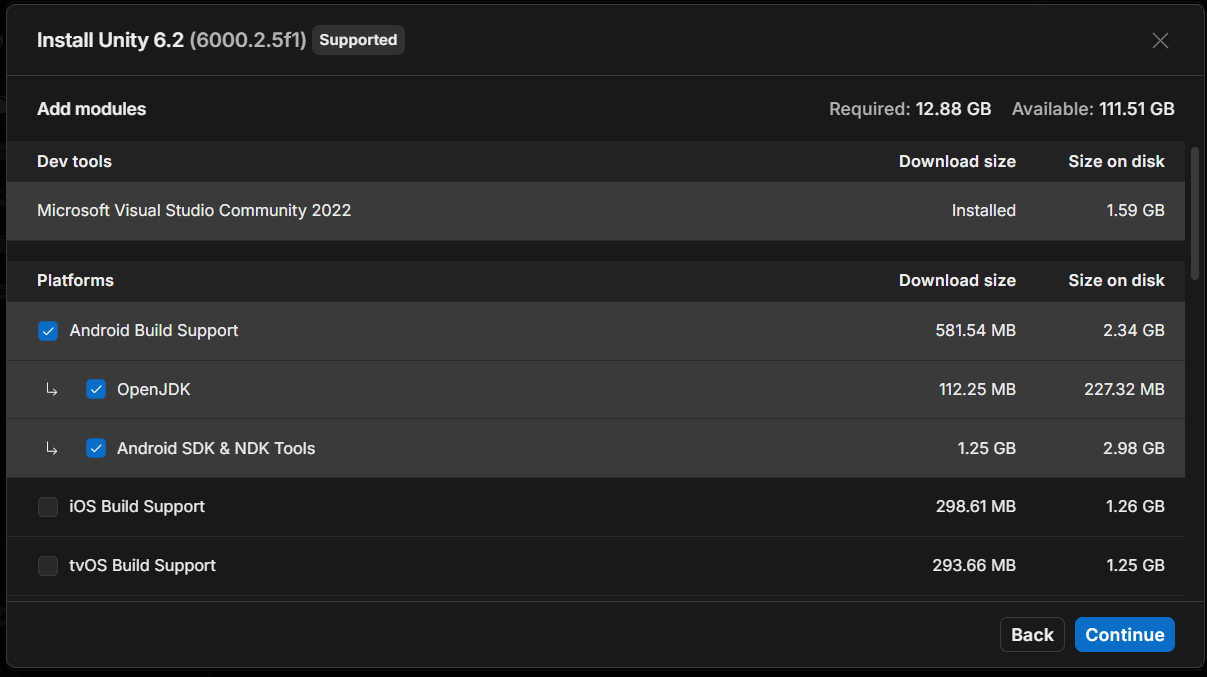
For Unity version 2020.3 and higher, SDK, NDK, and OpenJDK can be installed together while installing Unity Editor.
Import Latest Package Into New Project
This section describes how to import the latest QWR Unity packages into a fresh Unity project.
Make sure you have downloaded the latest QWR SDK package from our website before proceeding.
Follow these steps to import the latest package into your new project:
-
Download the package of the latest version from our website. It should be a zipped file which includes
com.qwr.core,com.qwr.utilitiesandcom.qwr.platformfolders. -
Unzip the downloaded SDK package somewhere on your disk.
-
Open the project in which you want to import the packages.
-
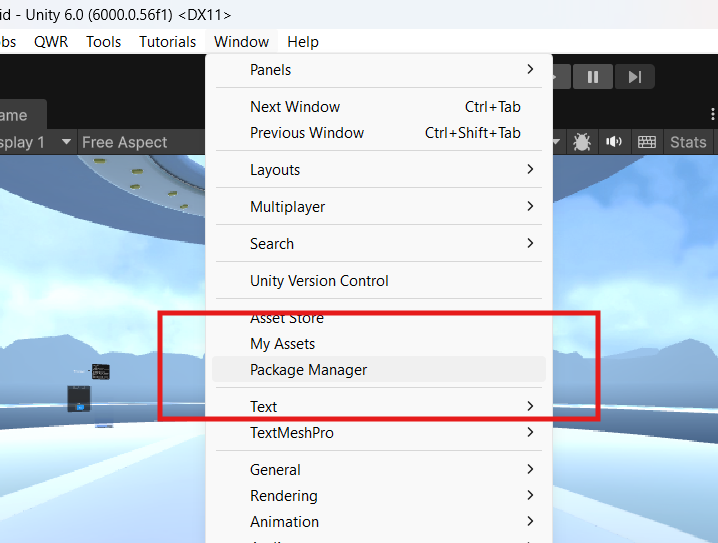
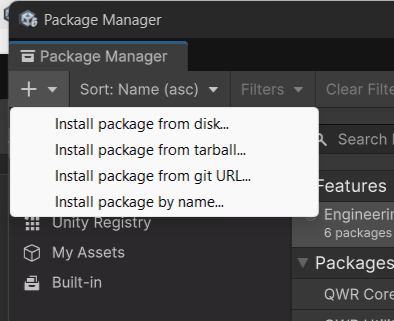
From the menu, go to Window > Package Management > Package Manager.
-
Within the popped-up window, click the "+" on the upper-left corner, select Add package from disk, enter the path you previously unzipped the downloaded SDK and select
Utilities,Core,Platformpackage JSON file in turn, e.g.com.qwr.core/package.json.
Build Settings
Build settings let developers set the target platform, configure build-related settings and start the building process.
It is highly recommended to set the target platform before performing any other project settings, as many settings may depend on the target platform.
For QWR devices, the target platform should be Android.
Follow these steps to switch the platform to Android:
-
From the menu, go to File → Build Settings.
-
Under the Platform block, select Android.
-
Under the Android block, set the Texture Compression to ASTC.
-
Click Switch Platform.
Project Settings
Add Product Details
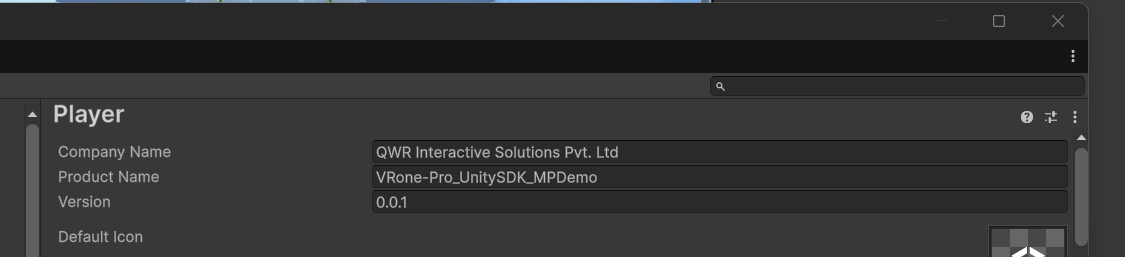
Basic product details can be added in Unity to identify your company and app.
-
From the menu, go to Edit → Project Settings → Player.
-
In Company Name, enter the name of your company.
-
In Product Name, enter the name of your app which will appear on the menu bar when your app is running.
-
In Version, enter the version number of your application.
Add Package Identification Details
The settings in this section will automatically change the package attribute in AndroidManifest.xml.
-
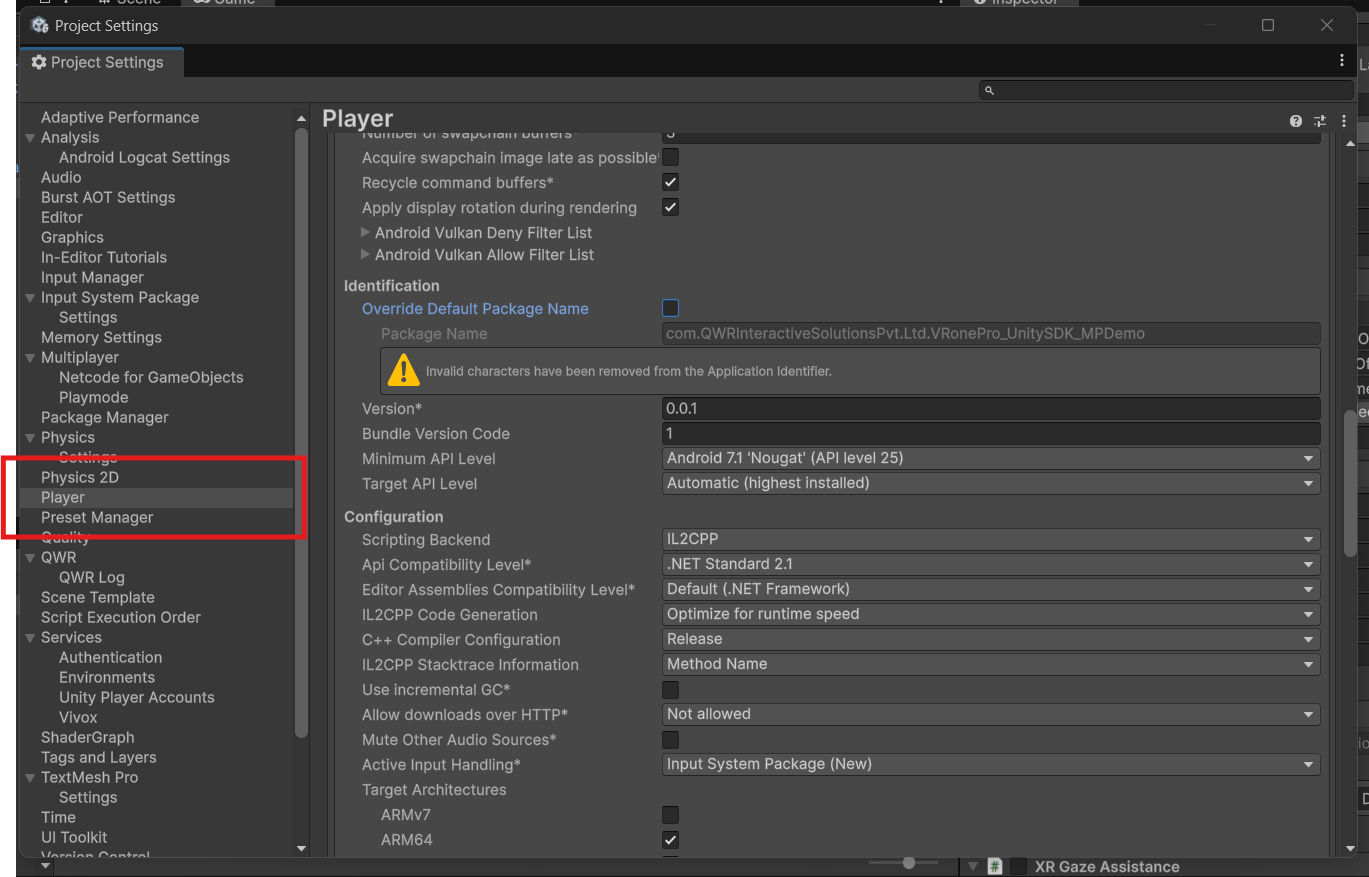
From the menu, go to Edit → Project Settings → Player, select Android tab in Player window, expand Other Settings toggle list and find the Identification block.
-
In Package Name, enter the application ID, which uniquely identifies your app on the device. The basic structure of this identifier should be
com.CompanyName.AppName.
- The
CompanyNamein the identifier should be equal to theCompany Namesetting in Project Settings. - The
AppNamein the identifier should be related to theProduct Namesetting in Project Settings. However, if needed, feel free to deviate from theProduct Name.
-
In Version, enter the build version number of the bundle, which identifies an iteration (released or unreleased) of the bundle. The version is specified in the common format of a string containing numbers separated by dots (e.g.,
4.3.2). -
In Bundle Version Code, enter the internal version number, which is used only to determine whether one version is more recent than another, with higher numbers indicating more recent versions.
This is not the version number shown to the user.
-
In Minimum API Level, set the minimum Android version (API level) required to run the application. For QWR devices, it needs to be set to Android 7.1 Nougat.
-
In Target API Level, set the target Android version (API level) against which to compile the application. In most cases, it should be set to Automatic (highest installed).
Configure Configuration Settings
-
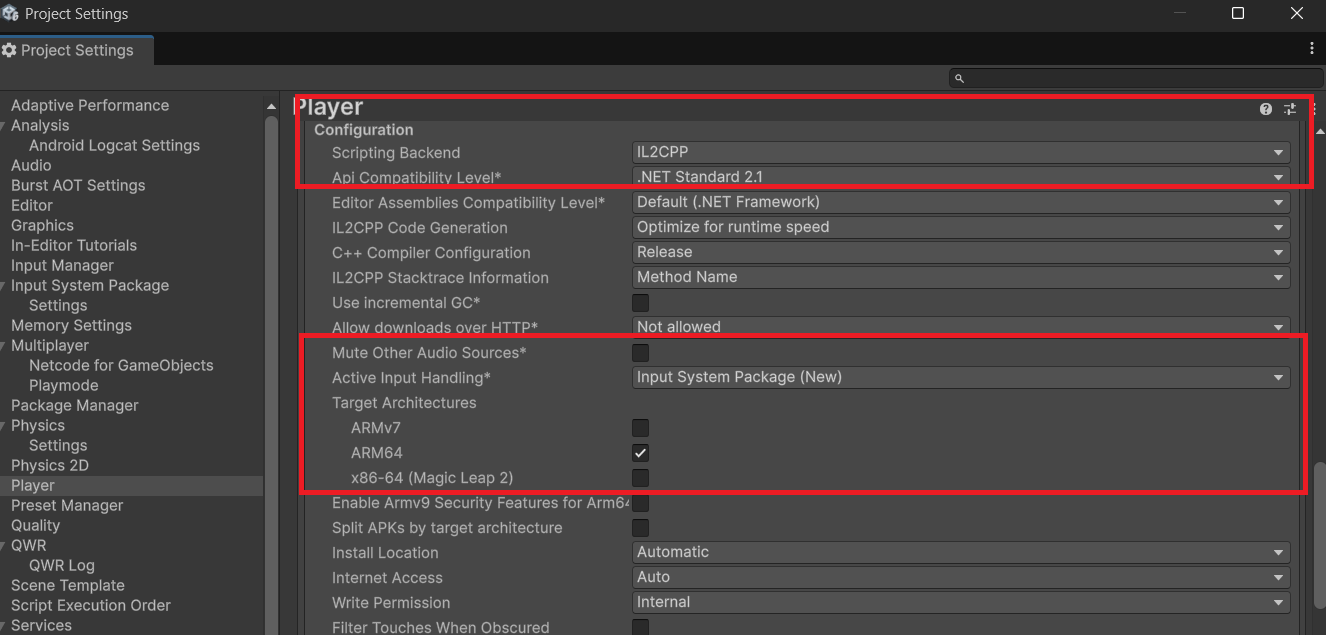
From the menu, go to Edit → Project Settings → Player, select Android tab in Player window, expand Other Settings toggle list and find the Configuration block.
-
In Scripting Backend, select IL2CPP.
-
In Target Architectures, select ARM64.
-
In Install Location, select Automatic.
-
In Allow unsafe Code, select it.
Configure Package Rendering Details
-
From the menu, go to Edit → Project Settings → Player, select Android tab in Player window, expand Other Settings toggle list and find the Rendering block.
-
Vulkan APIs are not supported for the time being. Thus, you can only choose OpenGLES3 or OpenGLES2, or both according to your project requirement.
-
Multithreaded Rendering is supported, feel free to select it, if needed.
Vulkan APIs are currently not supported. Use OpenGLES3 or OpenGLES2 instead.
Configure Resolution and Presentation
-
From the menu, go to Edit → Project Settings → Player, select Android tab in Player window, expand Resolution and Presentation toggle list.
-
Find the Orientation block, set the Default Orientation to Landscape Left.
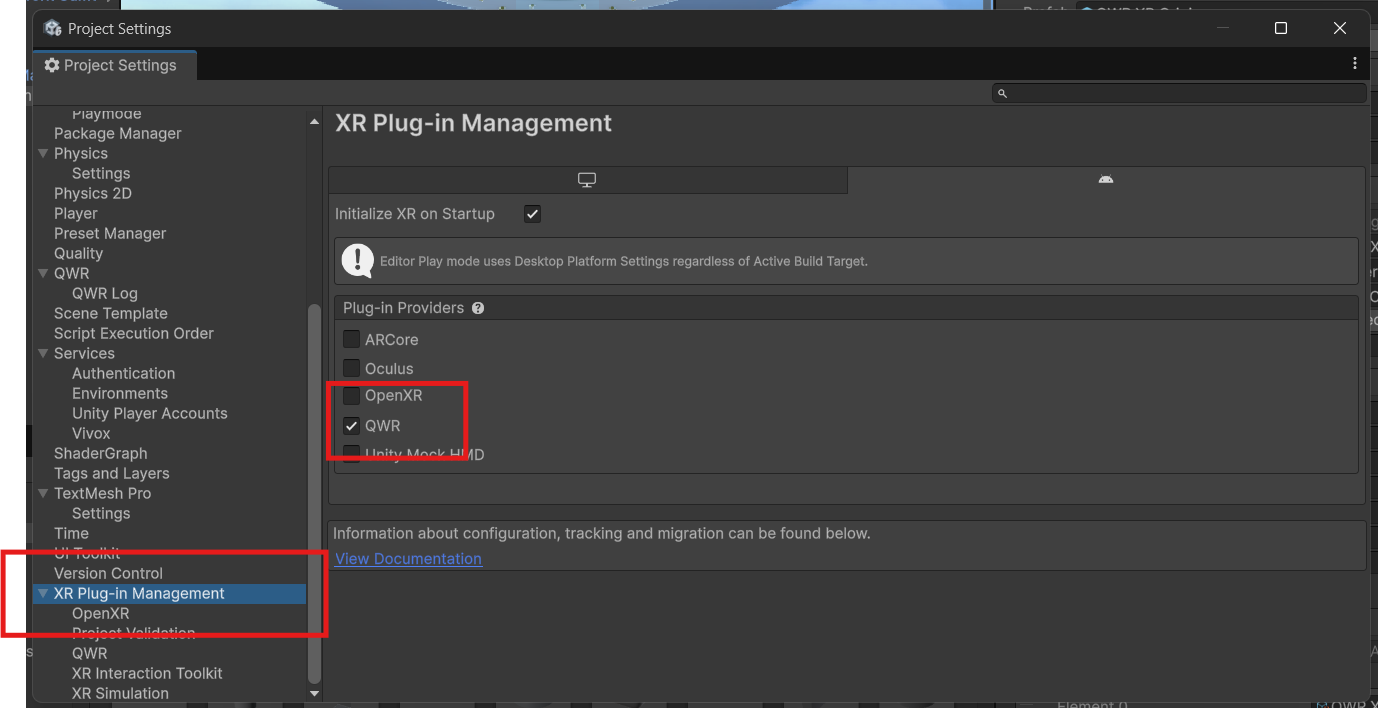
Configure XR Plug-in Management
-
From the menu, go to Edit → Project Settings → XR Plug-in Management.
-
Install XR Plugin Management, if it is not installed.
-
Select QWR as Plugin-in Providers.
Configure Management
-
From the menu, go to QWR → Tools.
-
Select the VR mode to identify this is a VR application.
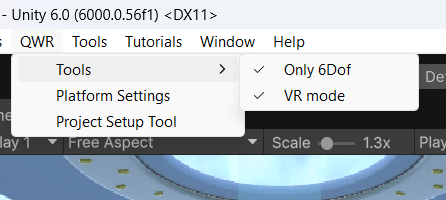
If you select VR mode, the metadata com.qwr.application.mode will be automatically added in AndroidManifest. For applications without this metadata, the system will treat it as a 2D application. The selection status is saved in Assets/XR/Resources/QWRSDKSettingAsset.asset.
Build Your First App
This guide helps you build your first VR app in Unity. At the end, you will have an installation file (.apk) of your VR app which can be installed on QWR devices.
Follow these steps to create a simple VR scene and build an Android .apk file:
-
From the menu, go to File, click New Scene to create a fresh empty scene.
-
From the menu, go to File, click Save As to save the scene just created. Select the saving path and enter the name for this empty scene (e.g. QWRDemo).
-
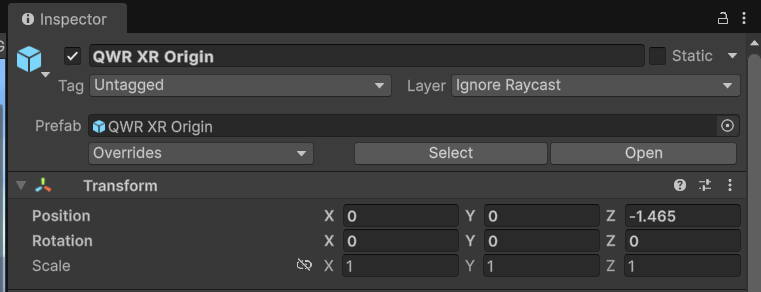
Enter the Project tab, expand the Packages > QWR Core > Prefabs folder, drag the
QWRCameraRigprefab into the Hierarchy panel. Ensure that both Position and Rotation property of theQWRCameraRiggame object in Hierarchy panel is(0, 0, 0).
-
Right-click on the Main Camera game object in the Hierarchy window, and click Delete.
-
Right-click on the empty area of the Hierarchy panel, select 3D Object > Cube to create a cube game object. Ensure that the Position property of the Cube game object is
(0, 0, 10). -
From the menu, go to File → Build Profiles, and click Add Open Scenes button in the Build Settings window to ensure this scene will be compiled into the output
.apkfile. -
In the Build Settings window, click Build button, and select the output path and enter the name of the output
.apkfile in the window that pops up.
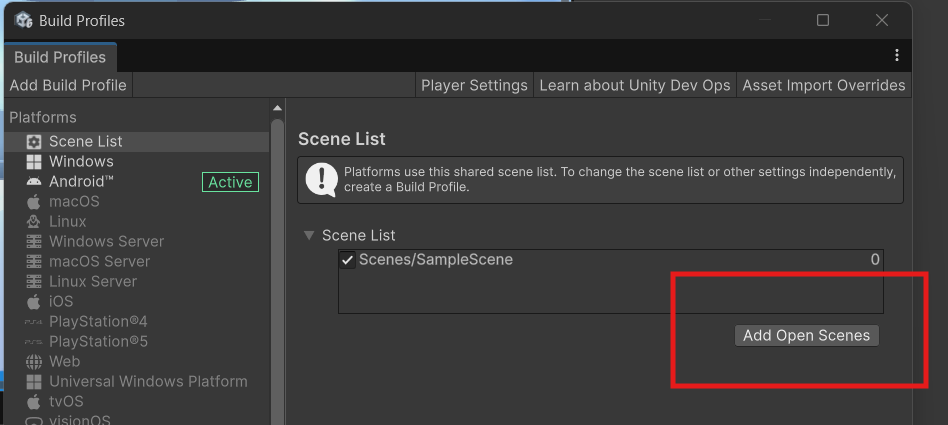
If everything succeeds, there should be a .apk file with your specified name in your specified output path.
Enable Device for Development and Testing
This section describes how to set up your QWR devices for testing and debugging your apps, and installing the output .apk file.
Enable Android Debug Bridge Debugging
Android Debug Bridge (ADB) is a command-line tool that helps developers perform various actions, such as installing and debugging apps, running shell commands, and managing files on the devices.
For more information about Android Debug Bridge, please refer to Android Debug Bridge documentation.
ADB should be installed with Android SDK, and located inside the platform-tools subfolder of the Android SDK.
To use the ADB tool in terminal, its path should be configured into the system environment. Once the system environment variable of ADB has been configured correctly, open the terminal on your computer and run the following command:
adb --version
The output should look like:
Android Debug Bridge version 1.0.41
Version 30.0.5-6877874
Installed as <adb path>
When your QWR headset has been connected to your computer, run the following command in the terminal:
adb devices
The ID of the connected device should show up in the terminal like this:
List of devices attached
d13de720 device
Install APK via ADB
When you build an app in Unity, it creates a .apk file, which is the installation file of Android application. The .apk file can be installed on the devices by using ADB commands.
Open the terminal on your computer and run the following command:
adb install -r <apk_Path>
For instance:
adb install -r .\QWRDemo.apk
Once the application is installed successfully, the following message should be displayed within terminal:
Performing Streamed Install
Success
Next Steps
Now that you have set up your first QWR SDK project, you can explore more advanced features:
- Hand Tracking: Learn about advanced hand tracking features
- Controller Support: Discover how to customize controller input
- Interaction System: Explore the physics-based interaction system
- Multiplayer: Set up networked multiplayer experiences
- Tutorials: Follow step-by-step tutorials for common use cases
Troubleshooting
If you encounter issues during setup:
- Ensure all required packages are installed and up-to-date
- Check that OpenXR is properly configured for your target devices
- Verify that your Unity version is compatible (2022.3 or newer)
- See our Troubleshooting guide for common issues