Getting Started
This guide will help you set up your development environment and create your first VR application for the VROne. Edu educational VR headset using the QWR Unity SDK.
QWR Unity Plugin
Supported Unity3D Versions
QWR Unity plugin is verified to support the following Unity versions:
- Unity3D 2019
- Unity3D 2020
- Unity3D 2021
Please try to match with the above versions, otherwise the plugin might not be working correctly. If you encounter any issues with the current version, you can download the QwrUnity0.7.10e version and QwrUnity0.8.1 (beta) version content by clicking here.
Please refer to My Very First Unity VR App and Unity Non-VR to VR Porting Tutorial for step-by-step tutorial.
Prerequisites
Before starting, ensure you have:
- Unity Editor (2019.4 LTS or newer)
- Android Build Support module
- VROneEdu device for testing
- USB cable for device connection
- Windows or macOS development machine
Step 1: Install Unity Editor
Download and Install Unity
- Download Unity Hub from unity.com
- Install Unity Hub
- Open Unity Hub and go to the Installs tab
- Click Install Editor and select Unity 2021.3 LTS (recommended)
- During installation, ensure Android Build Support is selected
Verify Installation
- Open Unity Hub
- Go to Installs tab
- Verify Unity 2021.3 LTS is installed with Android Build Support
Step 2: Download QWR Unity SDK
Get the Latest SDK
- Visit the QWR Developer Portal
- Download the latest QWR Unity SDK package
- Extract the downloaded package to a convenient location
SDK Package Contents
The QWR Unity SDK package contains:
QWRUnityPlugin.unitypackage- Main Unity pluginDocumentation/- API documentation and guidesSamples/- Sample projects and demosTools/- Development tools and utilities
Step 3: Create a New Unity Project
Create Project
- Open Unity Hub
- Click New Project
- Select 3D (Built-in Render Pipeline) template
- Set project name (e.g., "VROneEduDemo")
- Choose project location
- Click Create Project
Step 4: Import QWR Unity Plugin
Import the Plugin
- Open Unity3D, choose Assets > Import Package > Custom Package
- Select the downloaded unity package file and click import
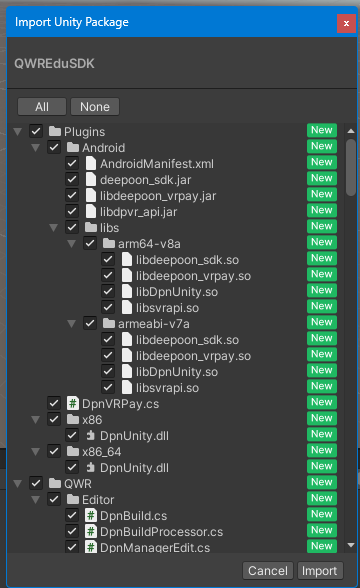
Verify Import
After import, you should see:
QWRfolder in your Assets- New menu items under QWR in the Unity menu bar
- QWR scripts and prefabs available
Step 5: Replace Camera
Set Up VR Camera
- Delete the original Camera
- Use
/Assets/QWR/Prefabs/QwrCameraRig.prefabinstead - Simply drag the prefab QwrCameraRig to where the original Camera locates
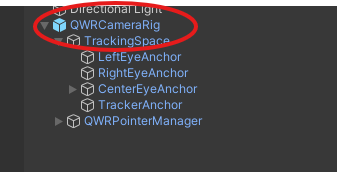
After replacing Camera, the features associated with the original Camera may require some adjustments. We recommend using Canvas in WorldSpace instead of ScreenSpace.
Step 6: Modify AndroidManifest.xml
The AndroidManifest.xml will be replaced by default during plugin-import stage. However, if you want to use self-defined AndroidManifest.xml, below are the changes needed to make on this file to make the VR App run on QWR All-in-One VR devices correctly.
Please refer to the plugin Assets/Plugins/Android/AndroidManifest.xml.
Required Changes
-
Inherit from class QwrActivity
- If the game inherits from UnityPlayerActivity, please change the inheritance to inherit from
com.qwr.sdk.QwrActivity - If the game does not inherit from UnityPlayerActivity, please set
com.qwr.sdk.QwrActivityas the main Activity
- If the game inherits from UnityPlayerActivity, please change the inheritance to inherit from
-
Add the following meta data to declare this application as a VR application:
<meta-data android:name="com.softwinner.vr.mode" android:value="vr"/> -
Add a VrListener statement for unity plugin 0.7.2d or later:
<service android:name="com.qwr.aw.vrsdk.VrListener" android:permission="android.permission.BIND_VR_LISTENER_SERVICE">
    <intent-filter>
        <action android:name="android.service.vr.VrListenerService" />
    </intent-filter>
</service>
Step 7: Unity3D Project Settings
Quality Settings
In Edit > Project Settings > Quality:
-
Select "Don't Sync" in the VSync option
- It will be best if the app frame-rate equals the display frame-rate. However, due to the hardware capacity and content complexity, the former frame-rate might be lower. Usually it is acceptable if the app frame-rate is greater than half of the display frame-rate. Just choose "Don't Sync" and QWRSDK will handle the VSync signal automatically.
-
If you find the performance too slow, try setting "Rendering" > "Anti Aliasing" to "Disabled"
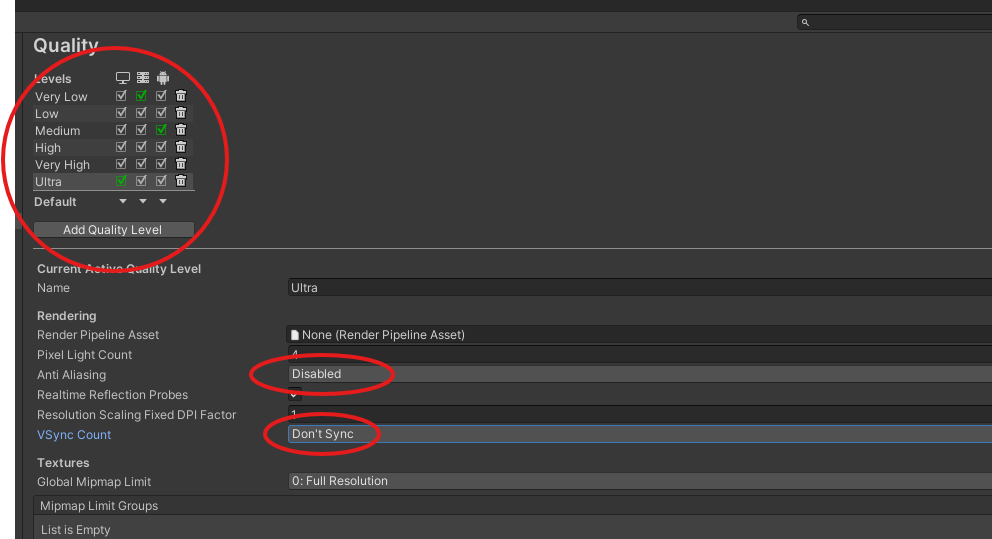
Please be noted that above setting should go through all the levels (from Fastest to Fantastic) so that there will be no missing point.
Player Settings (For Android QWR All-In-One Device)
In Edit > Project Settings > Player > Settings for Android > Resolution and Presentation:
- Change "Default Orientation" to "Landscape Left"
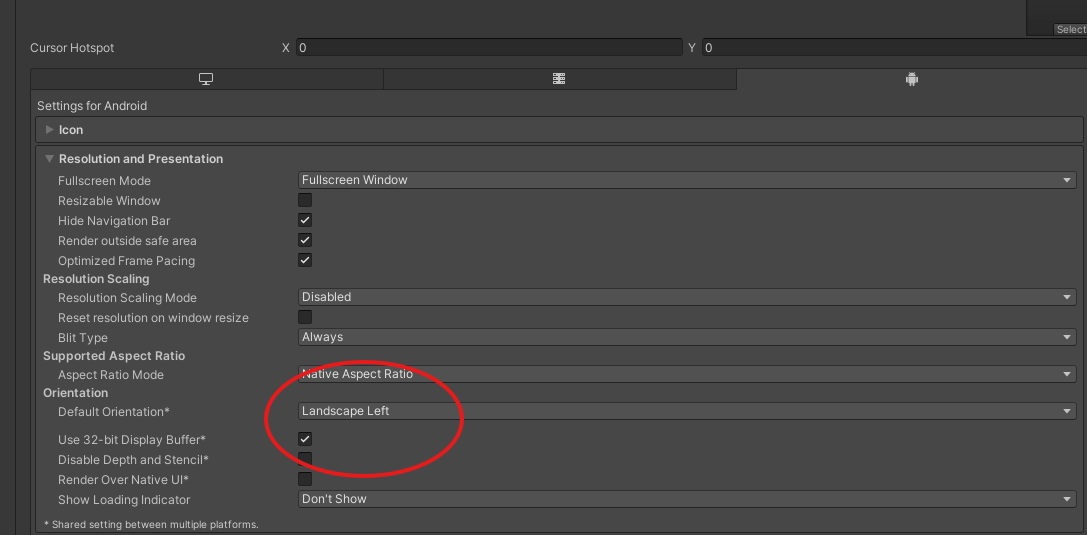
-
Check "Use 32-bit Display Buffer" (This is a must for P1 & P2 Lite, it is optional for M2/M2 Pro or P2)
-
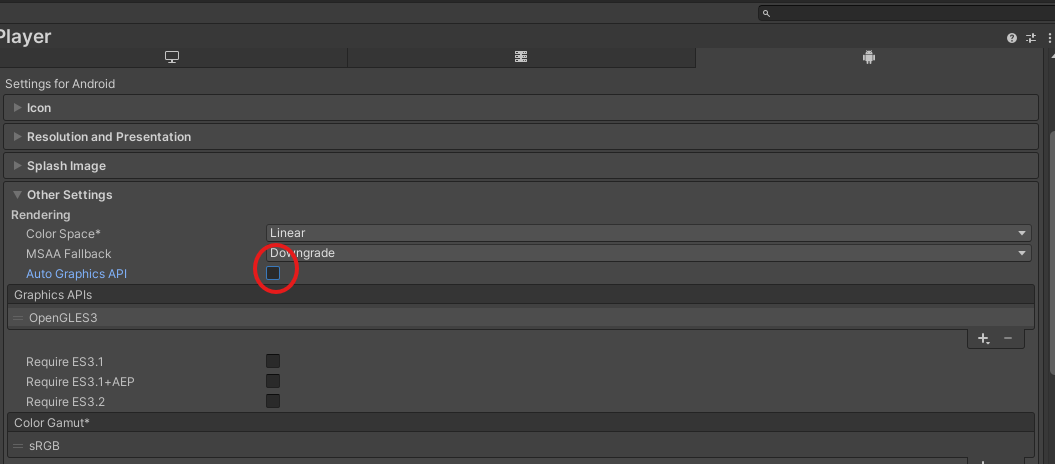
Current QWR Unity Rendering SDK does not support Vulkan yet. As a result, we recommend check "Auto Graphics API" option in Edit > Project Settings > Player > Settings for Android > Other Settings. Or, OpenGLES3 is recommended on top of the Graphics API list.
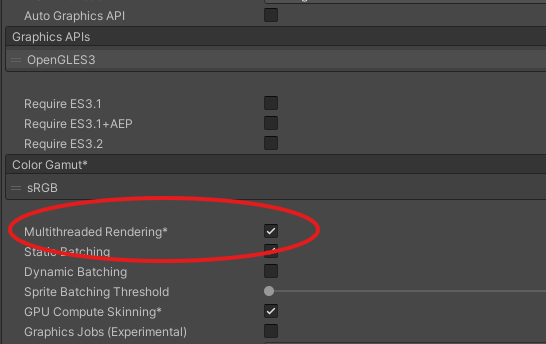
- In Edit > Project Settings > Player > Settings for Android > Other Settings, "Multithreaded Rendering" can be checked; However please be cautious to turn it on because this option was reported unstable in some Unity versions.
Time Setting (Recommended, not a must)
Open Edit > Project Settings > Time and set the "Fixed Timestep" to 0.01.
Step 8: 3DOF Controller
Import the QWR Unity Plugin
Import the QWR unity plugin (version 0.7.0 and above):
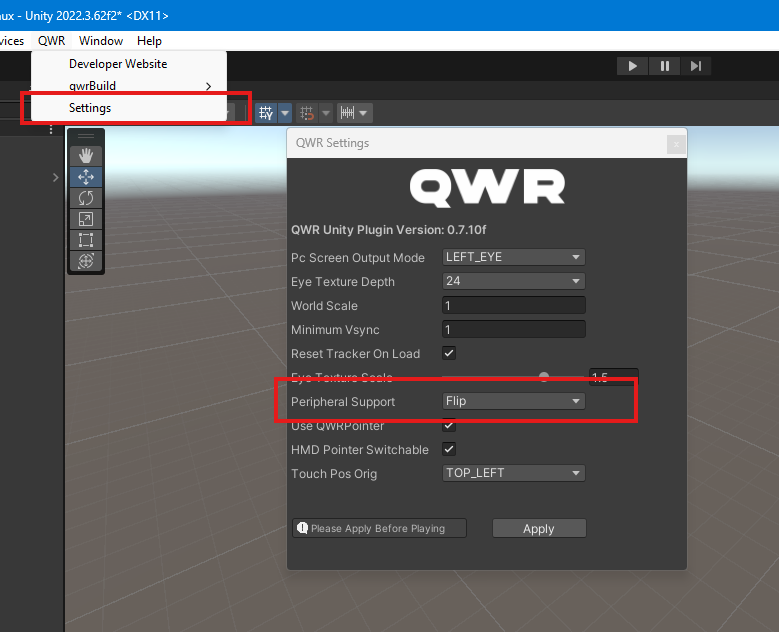
- In the menu QWR > Settings, please set the "Peripheral Support" option to "Flip"
- QwrCameraRig.prefab will automatically generate controller-related prefabs, including code and models
How to Get the Controller Information
-
Controller Properties: If you want to get the pose and button information of the controller, you can refer to the Daydream controller and use the according properties on the
QwrDaydreamController.csscript. For more information, please refer to the comment in the script. Compared to the Daydream controller, QWR flip controller adds a TRIGGER button, removes the VOLUMEUP and VOLUMEDOWN buttons, changes the APP button to a BACK button and keeps the HOME button. The BACK and HOME button behavior are handled automatically, no application processing is required.The current system default behavior for the 2 buttons is as follows:
- BACK: The function is the same as the BACK key on the HMD
- HOME: Short press returns to launcher, long press recenter calibration
-
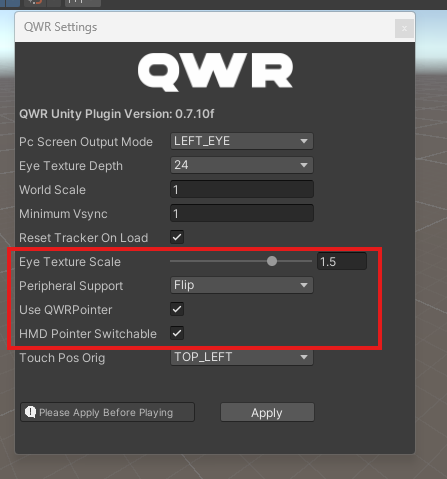
Ray Collision Algorithm: The controller comes with a ray collision algorithm by default. If the menu QWR > Settings > UseQWRPointer option is checked, QWR collision algorithm is used (default behavior); Otherwise user defined collision algorithm is taking effect
-
HMD Control: If you set the "Peripheral Support" option to "None". The app would use HMD control as gaze cursor. However in this case, the 3DOF controller can still work as a controller and report its touch and button event as long as it is paired to the All-in-One HMD. Similarly, if you set
QwrManager.QWRPointerto true, the QWR default collision algorithm will take effect -
Hand Mode Switching: On QWR Unity 0.7.3b and above, the 3DOF controller supports switching between left-hand and right-hand mode in unity plug-in. One can use Interface name:
QwrDaydreamController.interactiveHand { set, get }where 0 represents right-hand mode and 1 represents left-hand mode. Please update to the latest image so as to enable this feature.
-
UI Interaction: For UI interaction, On QWR Unity 0.7.6 and above, replace EventSystem with
QwrEventSystem(please refer to My Very First Unity VR App, section 7), or, alternatively, replace the StandaloneInputModule component under EventSystem withQwrStandaloneInputModule(please refer Unity Non-VR to VR Porting Tutorial, section 9).
Look Around in Editor Mode
In QWR Unity plugin 0.7.3b or newer version, the plugin provided an auxiliary camera mover script in Editor mode.
Hold down the Alt key, move the mouse around with the right mouse button pressed in Editor window to look around.
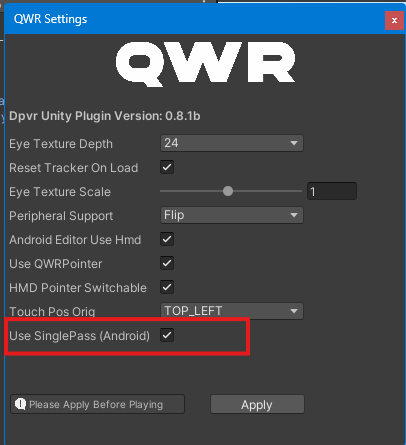
SinglePass (multiview)
In this mode, Unity renders the scene in a single pass using instanced draw calls. This mode greatly decreases CPU usage and slightly decreases GPU usage compared to the multi-pass mode.
Step 9: Build and Deploy
Configure Build Settings
- Go to File > Build Settings
- Select Android platform
- Click Switch Platform if needed
- Click Add Open Scenes to include your scene
Build the Application
- Click Build in Build Settings
- Choose output location and filename
- Click Save to start building
- Wait for the build process to complete
Install on Device
- Connect VROneEdu device via USB
- Install the APK using ADB:
adb install -r YourAppName.apk - Launch the app on the device
Step 10: Test Your Application
Basic Testing
- Put on the VROneEdu headset
- Launch your application
- Look around to test head tracking
- Move your head to test 6DOF tracking
- Verify the scene renders correctly
Educational Features Testing
- Test any educational-specific features
- Verify UI elements are readable
- Test interaction systems
- Check performance and comfort
Troubleshooting
Common Issues
Build Errors:
- Ensure Android Build Support is installed
- Check that all required packages are imported
- Verify project settings are correct
Device Connection Issues:
- Enable USB debugging on device
- Install proper USB drivers
- Check USB cable connection
VR Tracking Issues:
- Ensure QWR provider is enabled
- Check XR Plugin Management settings
- Verify device firmware is up to date
Getting Help
If you encounter issues:
- Check the Troubleshooting Guide
- Review the FAQ
- Contact QWR support
- Check Unity and QWR documentation
Next Steps
Now that you have a basic VR application running:
- Explore the Plugin Integration guide
- Check out Demo Projects for examples
- Learn about Educational Features
- Review the API Reference
Congratulations! You've successfully set up the QWR Unity SDK for VROneEdu and created your first VR application.